Blockchain explorers like SolScan, BaseScan, and Etherscan are your window into crypto networks. They let you look up any transaction, wallet address, or token on-chain.
For example, SolScan is the explorer for the Solana network, Etherscan is the explorer for Ethereum, and BaseScan is the explorer for the Base L2 network. Using these tools helps you DYOR (Do Your Own Research) by verifying project claims on-chain. In this guide well show how to:
- Trace wallet transactions (who sent/received tokens and when)
- Check token transfers and contract calls (view token movement and smart-contract data)
- Investigate developer wallets (find who deployed contracts or holds large token stakes)
Tracing Wallet Transactions
The first step in DYOR is often seeing where coins have moved. All these explorers have a search box where you can paste a transaction hash (signature) or a wallet address. If you enter a transaction ID, youll see exactly what happened in that transaction. If you enter an address, youll see the accounts balance and history.
- On SolScan (Solana) Go to solscan.io. Paste the transaction signature or wallet address into the top search bar and hit Enter. For example, a Solana transaction ID is a long string like 8rtuTqqCe7iR98KndAbK8VkTMGKe&. SolScan will then display the transaction details: the Signature, Block number, Timestamp, Status (Success/Failed), Fee paid, and who was involved. Below is a sample SolScan transaction page (note the From, To, Amount, Fee, etc.). In SolScan you can also switch tabs to see SOL Balance Change or Token Balance Change, which shows how token balances changed in this transaction.
- On Etherscan (Ethereum) Go to etherscan.io. The process is similar: paste a txn hash (long string starting with 0x) or an address into the search bar. The resulting page shows details of the transaction: From address, To address, value sent, gas used/price, etc. Etherscan also shows any contract calls or token transfers made by that transaction. In fact, Etherscans Transaction Details page lists the sender, recipient, timestamp, and gas used. For a failed transaction, it shows the error reason. As with SolScan, you get a full record of what happened on-chain.
- On BaseScan (Base L2) Go to basescan.org and do the same. BaseScan works like a hybrid of Etherscan for the Base chain. Searching a txn hash or address will show the transaction details. For instance, BaseScan will show the Status, Block number, Timestamp, From/To addresses, and Value (in ETH on Base) along with gas fees, just like Etherscan does. In fact, if you look at BaseScans interface, youll notice fields labeled From, To, Value, Fee, and so on exactly like Etherscans transaction overview.
In summary: Step 1 get the txn hash or address you want to check. Step 2 paste it into the explorers search bar. Step 3 examine the details page. Youll see who sent what to whom, how much they paid in fees, and whether it succeeded.
- Tip: If you want to trace an entire wallets history, search the address rather than a single txn. Youll see the account balance and a list of all transactions (incoming and outgoing). Each explorer breaks these down so its easier to read.
Checking Token Transfers and Contract Interactions
Blockchain explorers also let you see token movements and smart contract calls. A smart contract is just code on the chain, and you can usually see its code and calls if its verified. Heres how to do that:
- SPL and ERC-20 token transfers:
- SolScan: On a Solana wallets page, youll see tabs like SOL Transfers, SPL Transfers, and DeFi Activities. The SOL Transfers tab lists native SOL coin transfers. The SPL Transfers tab lists SPL token transactions (Solanas equivalent of ERC-20).
- Etherscan/BaseScan: On Ethereum or Base, each address page has separate tabs for ERC-20 Token Transfers, ERC-721 (NFT) Transfers, etc. If you click the Token Transfers tab, youll get a list of every ERC-20 transfer involving that address (separate from plain ETH transfers). This makes it easy to track exactly which tokens moved in or out.
- Smart contract details:
If you find a smart contract (for example, the code for a DeFi project or an ERC-20 token), you can click on it to see its page. Both Etherscan and BaseScan have a Contract tab. There you can view the verified source code and even call read/write functions if you connect your wallet. SolScan also shows program details for Solana contracts (though reading Solana code is more advanced). In any case, seeing the code or ABI lets you verify what a contract actually does, a key part of DYOR. - Token analytics pages:
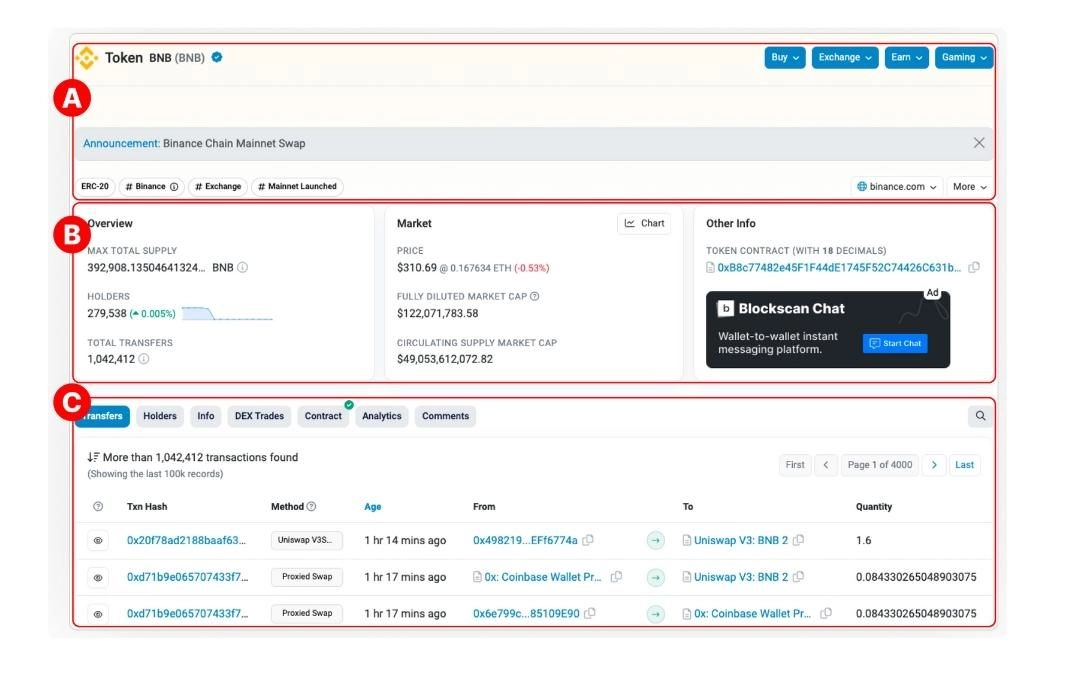
If you want to research a token (rather than a wallet), search by its contract or mint address. On SolScan you can search the SPL token address or even its ticker, but the safest way is by the tokens address. Youll then see a token page with data like total supply, holders, transfers, price charts, etc. (see image below). On Etherscan/BaseScan, searching an ERC-20 contract brings up a token info page with Holders and Transfers tabs. The Holders tab lists all addresses holding the token and their percentage of the supply. Large holders there could be team wallets. The Transfers tab shows the chronological token transfer history. These token pages help you spot if a few wallets control most of a token, or how active it is on exchanges.
Investigating Developer and Team Wallets
Part of DYOR is identifying project insiders. Developer wallets are often the ones deploying contracts or holding large token reserves. Heres how to investigate them:
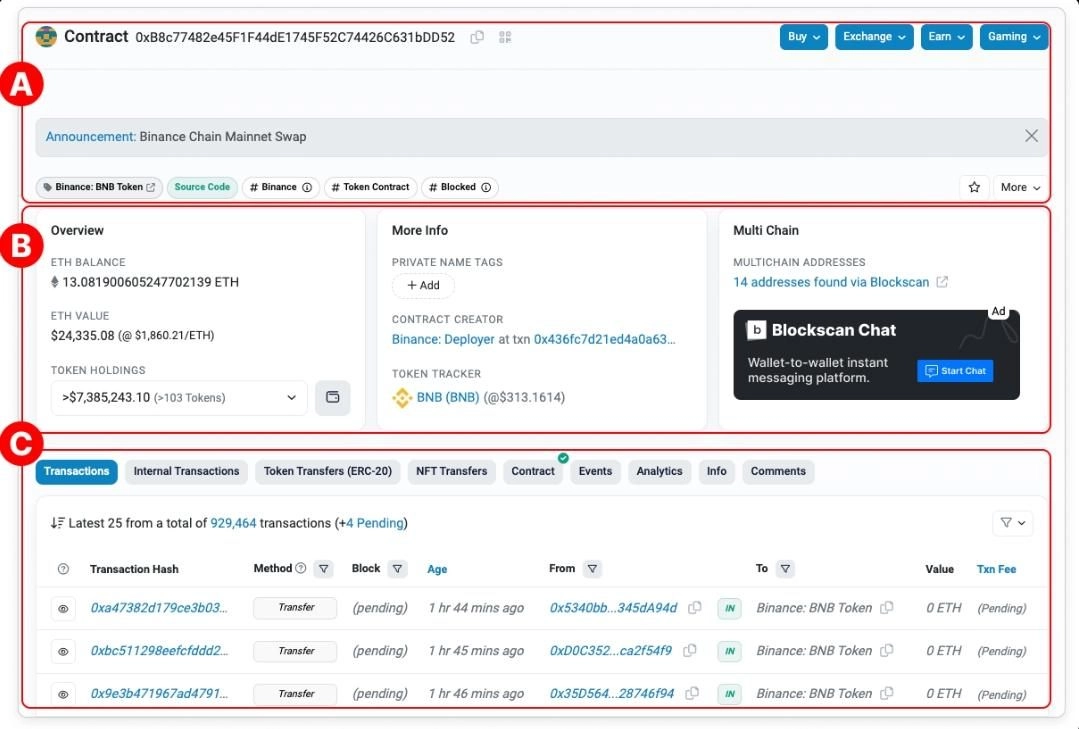
- Find the contract creator: On EVM chains (Ethereum, Base), when a new smart contract is deployed, explorers record which address created it. On Etherscan (and BaseScan), the contract page will have a Contract Creator field. That field shows the deployers address and the transaction of creation. For example, if you open an ERC-20 tokens contract page, youll see something like Contract Creator: 0xAbC123&. Clicking that address takes you to the deployers wallet page, revealing all its past activity. This is likely a developer or team address. A guide on BscScan shows the same idea: copy the tokens contract address into the explorer, then look at the Contract Creator on the right side.
- Check token distribution: On token pages, large holders often include the project team. As mentioned above, the Holders list will rank addresses by balance. If you see one or two addresses holding, say, 40% of the token supply, those are probably the founders wallets. For Solana SPL tokens, the SolScan token page shows top holders as a percentage chart. You can click any holder address to investigate it further.
- Use name tags and labels: Etherscan/BaseScan sometimes attach labels (like Founder or Coinbase or project names) to known addresses. While not always present, if an address has a public name tag it will appear on its profile. You can also add an address to your watchlist for notifications.
- Real-world example: Suppose youre researching a new token. First, find its contract/mint address (often on the projects site or CoinMarketCap). Paste that into an explorer. On Etherscan/BaseScan youll see the creators address (maybe labeled token deployer)
On SolScan, look at the tokens mint authority or initial transactions. Then view the holder list: if one address controls a huge chunk, you can click it. Youve now found the devs wallet. From there, you can see if theyve moved any tokens recently, which exchanges they used, etc.
- Cross-chain tracking: Tools like Debank can aggregate a wallets balances across chains once you identify its public key. For pure explorer use, youll do that separately on each chains explorer.
Putting It All Together
Using SolScan, BaseScan, and Etherscan in tandem gives you a powerful DYOR toolkit. You can:
- Trace any transaction or wallet by searching on-chain and reviewing details.
- Follow token flows by switching to the right transfer tabs.
- Inspect contracts by reading verified code on the explorer.
- Spot team wallets by looking at contract creators and holder charts.
- Example recap: Imagine you read that Project X just raised funds. To verify, you find the token sale contract on Etherscan. You see who created it, and you see the tokens holders on SolScan. Maybe you discover the teams wallet just dumped tokens to an exchange. Youve done your own research by following on-chain breadcrumbs all thanks to explorers.
Remember: Blockchain explorers are public and censorship-resistant. They dont lie, the data is on-chain. By using these tools in a thoughtful way (and double-checking anything that looks suspicious), you can protect yourself from scams and make informed decisions. Each explorer has a similar interface: a search bar, result pages with clear fields, and helpful filters.
Disclosure: This is not trading or investment advice. Always do your research before buying any cryptocurrency or investing in any services.
Follow us on Twitter @nulltxnews to stay updated with the latest Crypto, NFT, AI, Cybersecurity, Distributed Computing, and Metaverse news !